Using the MU Python IDE with an ESP8266 flashed with MicroPython
Installing the alpha build on Windows after setting the Global version of Python to 3.8.0
Long story short (the long story is under these instructions if you want to read the pain it took to get here), we need to install pyenv through pip and use it to install and set the global running version of python to be 3.8.0
In a command line window:
ms-dos
python -m pip install --upgrade pip
python -m pip install pyenv
python -m pyenv install 3.8.0
python -m pyenv global 3.8.0
Now go to the MU - Downloads page at: https://codewith.mu/en/download and download the Alpha version in the scary red box at the top. Install it, plug in your ESP8266 and run MU, it should automatically recognise the ESP board and give you all the functionality (files, repl etc etc).
The really long and painfuyl road it took to get here
and so it begins
Now for this I am using a clone of the popular Wemos D1 Mini
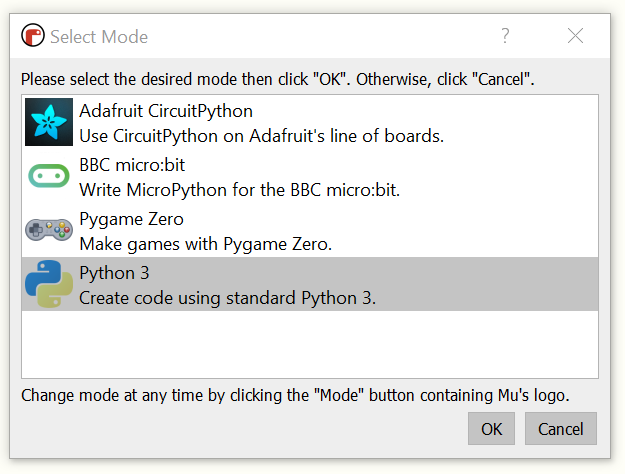
If you haven't installed it yet then visit the MU website, install and download it from here: https://codewith.mu/en/download. When you run it it will ask what board you are using with it, the dialog will look like this:
Now, the ESP8266 doesn't appear in that list because of a small-ish long story, skip to the next chapter if you're not interested (it's totally fine, I don't mind :) ).
So, for those that are still here, it's pretty simple really. The ESP8266 doesn't actually have a USB port of it's own. Any USB port that is on a board with a ESP8266 is seperate from that. Usually they are FTDI UART (serial) to USB translator chips, in my case on this cloned D1 Mini it's the classic FTDI CH340.
Now, another word of warning, the FTDI CH340's themselves have been cloned to beyond the pale which means you can have interesting times getting Windows to recognise the devices. This is because occasionally FTDI have been known to bake identifiers into their drivers which are brought into Windows, so when Windows sees a USB device that connects using the VID and PID of a known FTDI device, the FTDI driver then checks the device for a matching code, which doesn't exist because FTDI didn't make the clone, so the device doesn't communicate. Now I won't go into how to solve that, the internet is full of helpful pages that tell you how to do it, I'd just be adding to that here. Just search using windows ftdi driver issue and read through. With what you just read in this paragraph you already know why this is an issue so will be able to pick up the right guidance from the search results ;).
Fixing stuff is easy when you know the exact nature of the fault.
And yes, whilst it is a bit of a dick-move from FTDI I can totally sympathise with them for it. [shrug]
So, now we know about VID's and PID's and how they are used to recognise a specific device, then what's that to do with the ESP8266 not being in the list?
Simple really, the ESP8266 is connected to USB using the USB to Serial chip, but that could be anything so the VID and PID signature to match what type of board you're wanting to use MU with could be anything.
So we'll look at the device and work out what the VID and PID is and make our own. It's a bit fragile because if we sue a different board we may need to do this again, but it'll certainly get us running for this one.
Creating your own ESP8266 Board within MU's Mode selector
First we need to find the VID (vendor ID) and the PID (Process ID?) of the ESP8266 USB device.
On Windows you simply go to Device Manager (if you don't know what that is, use it as a search term on the main Windows Start button, don't worry we won't be making any changes).
It will look something like this:
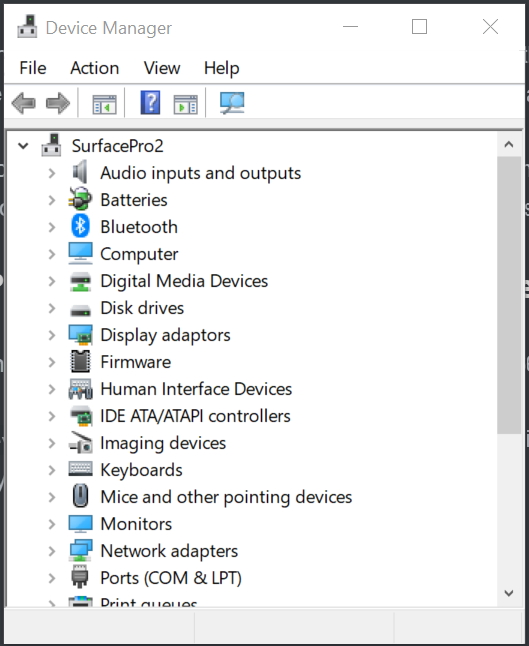
Have a look through that list till you find something like Ports(COM & LPT), open it and you should see the COM ports available on your system. Mine looks like this:

Now I know that my ESP8266 is the USB-SERIAL CH340 (COM8), so I'll double click that and in the dialog that pops up go to the Details tab and select HArdware ID's from the dropdown

Tada! there it is! My VID 1A86 and the PID is 7523!
Right, so now the trickier bit, how do we add a new board mode to MU?
Well a lot of work has gone into the AdaFruit and Micro:Bit board definitions and these both use Circuit/MicroPython so for me, with the Micro:Bit being closer (MicroPython vs CircuitPython) I'll extend the recognised boards to also include my devices VID and PID.
So, on my system MU is installed at: C:\Windows\System32\cmd.exe and searching through the files I find the board definitions are in pkgs/mu/modes/, there's one in there for adafruit.py and another for microbit.py.
In the microbit python file there is a class of:
python
class MicrobitMode(MicroPythonMode):
...and in that the VIDS and PIDS of valid boards, along with a serial number checker:
```python valid_boards = [ (0x0D28, 0x0204), # micro:bit USB VID, PID ]
valid_serial_numbers = [9900, 9901] # Serial numbers of supported boards. ```
So I extend the valid_boards to include my board:
```python valid_boards = [ (0x0D28, 0x0204), # micro:bit USB VID, PID (0x1A86, 0x7523), # ESP8266 CH340 USB VID, PID ]
valid_serial_numbers = [9900, 9901] # Serial numbers of supported boards. ```
Save that file (it needed to be saved with Admin proviledges) and reload MU and hopefully it should automatically see the device:
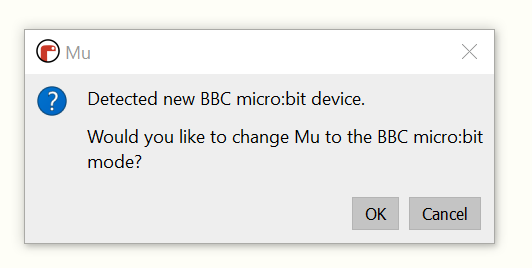
Click OK, then in MU go to REPL and put in print("hi") and press enter, if it then writes hi afterwards, your ESP8266 is responding properly.

That's it for the minute. I'm going to keep looking at this as MU is a very nice way to use a ESP8266, so I'd love to add in the Files functionality so we can manage files stored on the device as this is absolutely key to using a ESP8266 day to day, but as we stand right now this is a huge leap forward for usability alone :)
NOTE I've just looked at the source for MU and there is a ESP board mode in the master branch! Github - MU - /mu/modes/ I'll pull the esp.py and the related api/esp.py into my local MU install, comment out the board VID,PID I added to micro:bit and see if it then provides all the functionality!
update I'm giving up now.. running MU requires QT5, but getting the right version installed in a Windows version-locked instance of Python using pyenv is painful as all hell. The difference between the master branch and whatever they have as the released version are way too different so until the released version brings in the ESP boards, I'll hold off.
further update There is a alpha version (close to master github branch) installer for Windows, but when I tried it in the past it was falling over on Python versions, however I've managed to resolve these using pyenv! I'll move all of this too the foot of this document, and just make up some instructions on installing Pyenv, setting the global to be 3.8, then installing the alpha build.